


|
HELLO! It's been a while and here's an update on what I baked today - Lemon & Matcha Madeleines! Madeleines are French traditional small sponge cake with shell-like shape. Usually it is sprinkled with icing sugar or coated with glaze after it has been baked & cooled. However, the ones I baked today has none of it cos I ran out of icing sugar. I did attempt to purchase icing sugar at NTUC but they ran out of stock. I also tried to go to Red Man (aka Phoon Huat) but cos of the current circuit breaker in place, customers need to register first & the waiting time is 2 hours. I guess I'm unable to use icing sugar during this period 😅 But okay, actually it can do without icing sugar & glaze too. It tastes just as good! So, anyway I adapted the recipe from youtube: https://www.youtube.com/watch?v=8oOHooJl3NM This is a lemon madeleine recipe but I also made the matcha one based on this recipe. Also, since this recipe can only make around 6-8 madeleines, I actually doubled the amount of ingredients for the lemon madeleines while keeping the amount the same for the matcha ones. In the end, I made a total of 24 madeleines (16 lemon, 8 matcha). I shall now post the recipe below (this is if you want to make ard 6-8 madeleines only; otherwise you can also double or even triple the amount of ingredients if you want):
Ingredients (lemon madeleine)
Lemon zest from 1/2 lemon
some lemon juice (this was actually not in the original recipe but I figured it would make the lemon taste stronger so I added some lemon juice in)
50g of melted butter
1 egg
40g of sugar
50g of cake flour
2g of baking powder
Methods
1. Melt the butter & let it cool. From the recipe, the butter has to be cooled because hot butter will be pre-activated with baking powder and it will cause the batter to not bake beautifully. Madeleines should 'swell' up when baked.
2. Mix the lemon zest & lemon juice into the melted butter. Mix well.
3. In another bowl, break the egg and mix the whites & yolks evenly. After which, mix with sugar evenly.
4. Then, sift in the cake flour and baking powder. Mix evenly.
5. Add the melted butter and mix until the mixture is smooth.
6. Refrigerate for 30 minutes (for me, I actually refrigerated it for an hour because I actually watched other videos that stated the dough should be refrigerated for around 1-3 hours or even overnight. Hence, I figured 1 hour would be a safe choice).
7. Pour the mixture into a piping bag.
8. Apply melted butter to the madeleine pan.
9. Fill 80-90% of each frame on the pan with the mixture using the piping bag. Please make sure the hole of the piping bag isn't too big cos you wouldn't want the mixture to flow out too much & too quickly and end up overflowing the frames of the pan.
10. Bake it in a preheated oven (170-180 ℃ / 338-356 ℉) for around 12-15mins.
11. Let it cool before serving.
Ingredients (matcha madeleine)
50g of melted butter
1 egg
40g of sugar
50g of cake flour
5g of matcha powder
2g of baking powder
Methods
1. Melt the butter & let it cool. From the recipe, the butter has to be cooled because hot butter will be pre-activated with baking powder and it will cause the batter to not bake beautifully. Madeleines should 'swell' up when baked.
2. In another bowl, break the egg and mix the whites & yolks evenly. After which, mix with sugar evenly.
3. Then, sift in the cake flour, matcha powder and baking powder. Mix evenly.
4. Add the melted butter and mix until the mixture is smooth.
5. Refrigerate for 30 minutes (for me, I actually refrigerated it for an hour because I actually watched other videos that stated the mixture should be refrigerated for around 1-3 hours or even overnight. Hence, I figured 1 hour would be a safe choice).
6. Pour the dough into a piping bag.
7. Apply melted butter to the madeleine pan.
8. Fill 80-90% of each frame on the pan with the mixture using the piping bag. Please make sure the hole of the piping bag isn't too big cos you wouldn't want the mixture to flow out too much & too quickly and end up overflowing the frames of the pan.
9. Bake it in a preheated oven (170-180 ℃ / 338-356 ℉) for around 12-15mins.
10. Let it cool before serving.

The first batch of the lemon madeleine mixture. This is how it looks like after it is piped onto the pan. Make sure it is 80-90% filled, because it will expand in the oven due to the baking powder.

Tada! Can you see the swelling of each madeleine?

This is the next batch (both lemon & matcha madeleines).

TADA! YUMS 😋
HELLO! I made this back in 2015 for one of my friends' 21st birthday parties once again~ Apparently it was one of the most popular desserts at the party (I was quite shocked to know that so many ppl enjoyed it cos it was my first time baking that upon my friend's request). So here's the recipe:
Ingredients
Crust
32 (330g) Oreo cookies, whole
1/2 cup (110g) butter, melted (note that it should be cooled down for some time)
Chocolate Filling
7 oz (200g) milk chocolate
3.5 oz (100g) bittersweet chocolate (55-70% cocoa)
7 oz (200ml) heavy cream
Topping
10 oz (300g) fresh strawberries (actually this is up to individual's preference. If you don't like strawberries, you can reduce it or not put it at all. just that if you put, the overall appearance is a lot better)
chopped nuts (i.e. almonds, pistachios, etc.) - once again, this is optional. In fact, I didn't put this cos I dun really like to put such nuts in the dessert
Methods
1. Place oreo cookies (with filling, no need to remove it) into the bowl of a food processor & blend until crumbs form.
2. Add melted butter and pour over the crushed cookies. Process until evenly moistened.
3. Press the cookie mixture with the back of the spoon and your fingers where necessary, into the bottom and edges of a rectangular 5x14 inch (12x36cm) tart pan (to tell the truth, I think as long as the pan isn't too small or too big, it doesn't have to necessarily adhere to this measurement). Freeze until you prepare the filling, just for few minutes.
4. In a small saucepan, place cream over medium-low heat for a few minutes to get hot. No boiling or simmering needed. Remove from heat, pour over chopped chocolate and let rest for 1-2 minutes. Stir until dissolved.
5. Pour chocolate filling over oreo crust, and top with fresh strawberries or chopped nuts (based on your own preferences).
6. Refrigerate for at least 2 hours or overnight before serving.

Tada!! Oh yes, I forgot to mention that before putting in the oreo crust, you can put a baking sheet into the pan so that you can have it taken out easily as well (this is optional also; up to individual's own preference).
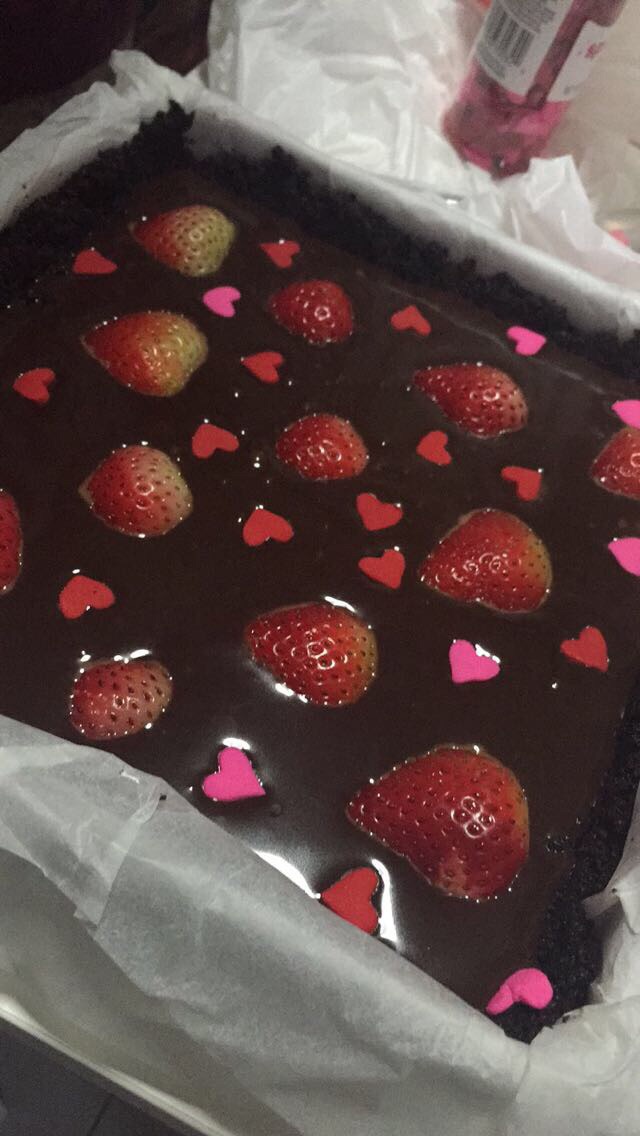
hahaha you can even decorate it with those edible heart sprinkles. Isn't it pretty? :D

Hehehe this was the dessert table 3 years ago!! With Strawberry (Jelly) Hearts Cheesecakes & Red Velvet Cupcakes.
We often see recipes that require beating of egg whites to a particular firmness; and sometimes they may use the terms "stiff peak" or "soft peak". We often see these terms in recipes of macarons, meringues, marshmallows, souffle, etc. Just what is the difference between soft and stiff peaks?
The first stage of beating egg whites is the foamy stage, where you will see bubbles and foams. It is still liquidy and does not hold any shape at this stage.
The next stage is the soft peak stage, where you will observe that the egg whites will mound without any sharp tips (it will slump over). If you were to continue beating, it will eventually reach stiff peaks which should look like this: 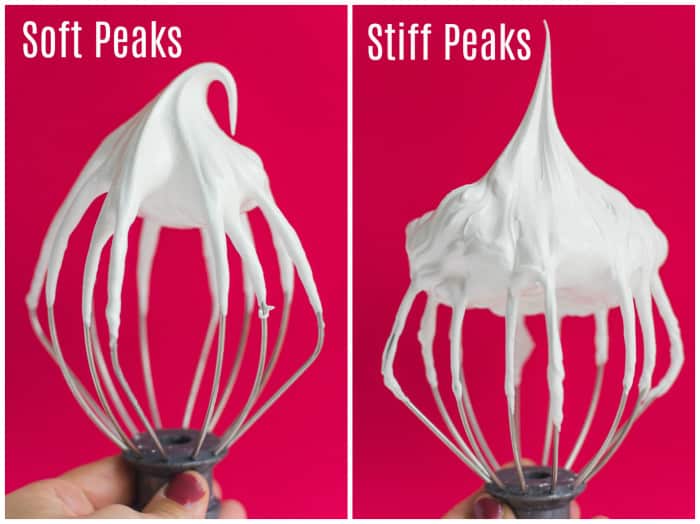
See the difference between soft and stiff peaks? Stiff peaks appear to be more firm and has a sharp, standing tip when you lift the beater.
Source: Food with Feeling
To double check that you have beaten the egg white until stiff peaks have formed, you can even try to turn the bowl with the egg whites upside down. The egg whites should not flow out at all! ;) If it flows out, that means it is still at its soft peaks. Another way of checking is of course to stop beating for a while and check your beater like the picture shown above. If it has a sharp, standing tip then it has reached the stiff peak.
One thing to take note is that one should not overbeat it. If you continue to have it beaten past its stiff peaks, it will end up looking like this:
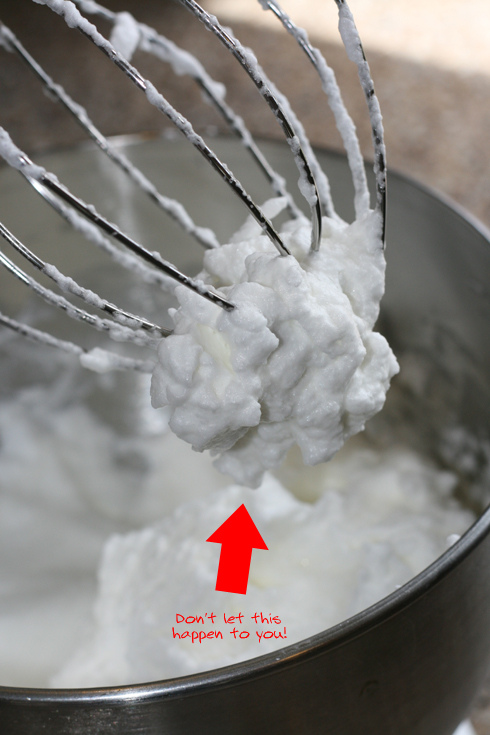
It looks kind of like those shaving cream, doesn't it? 😂 If the egg whites become overbeaten, it will become dry and clump together. And if added to other ingredients, it will break down the batter and unable to create the product that you intend to do so. Hence, always be careful. It's not easy but as long as you are careful and observant enough, this should not be happening :)
Source: Whisk Kid  A picture summary of foamy egg white, soft peaks, stiff peaks and overwhipped egg white. Source: Fountain Avenue Kitchen And now, I am going to give some tips as to how to go about getting these peaks. TIP 1: Make sure there is no trace of egg yolks in the egg whites and that the bowl you are using is clean and dry. Any water droplets or egg yolk are regarded as contamination and may affect the outcome of your beaten egg whites. TIP 2: Use room temperature eggs. This is so that it will achieve the fullest volume. If you have refrigerated the eggs, leave it out in room temperature for at least 30 minutes before beating it. TIP 3: Beat the eggs at slow speed until they are foamy and then gradually increase the speed to medium-high. It will then reach the soft peak stage before eventually reaching the stiff peaks. Stop beating once you have reached the peak that you want. Otherwise, it will become overbeaten. TIP 4: Sometimes, sugar is added into the egg whites (e.g. meringues or macarons) to be beaten together to obtain stiff peaks. You should not add in all the sugar at one go. Rather, you should have them added little by little at different times (i.e. add 1/3 of the sugar into the egg white and then beat it for a short while. After that add another 1/3 and have it beaten agn. Lastly, add the remaining sugar and continue beating until you get your desired peak). The presence of sugar will also bring about a glossy appearance for the stiff peaks. TIP 5: I can't really be sure on how long to beat the egg whites for cos it kind of differs in terms of what kind of mixer you are using (hand-held mixer, stand mixer - in fact, it is easy to overbeat the egg whites using stand mixer) and the speed that you are using (the speed might be different for different types of mixers). But if I really need to state the amount of time, I would say that it will take around 5-6 minutes to reach stiff peaks when you use a hand mixer. If it is longer than that, it will most likely become overbeaten. I hope these tips help! :) |


